

A MacBook that has started to slow down, throw frequent errors, or prepare for a new owner does not always need to be treated as old hardware. A full reset can clear the machine, remove personal files, and wipe software that is no longer needed.
That process also matters for privacy. When done correctly, the MacBook can be returned to a clean state that is ready for reuse or sale without leaving personal data behind.
Before any reset begins, the most important step is to protect important files. Back them up to an external hard drive or a cloud service first, because a reset will remove everything from the device.
It is also necessary to sign out of the Apple account through System Settings. Any Bluetooth devices that are still connected should be removed with the Forget This Device option so the reset process does not run into problems later.
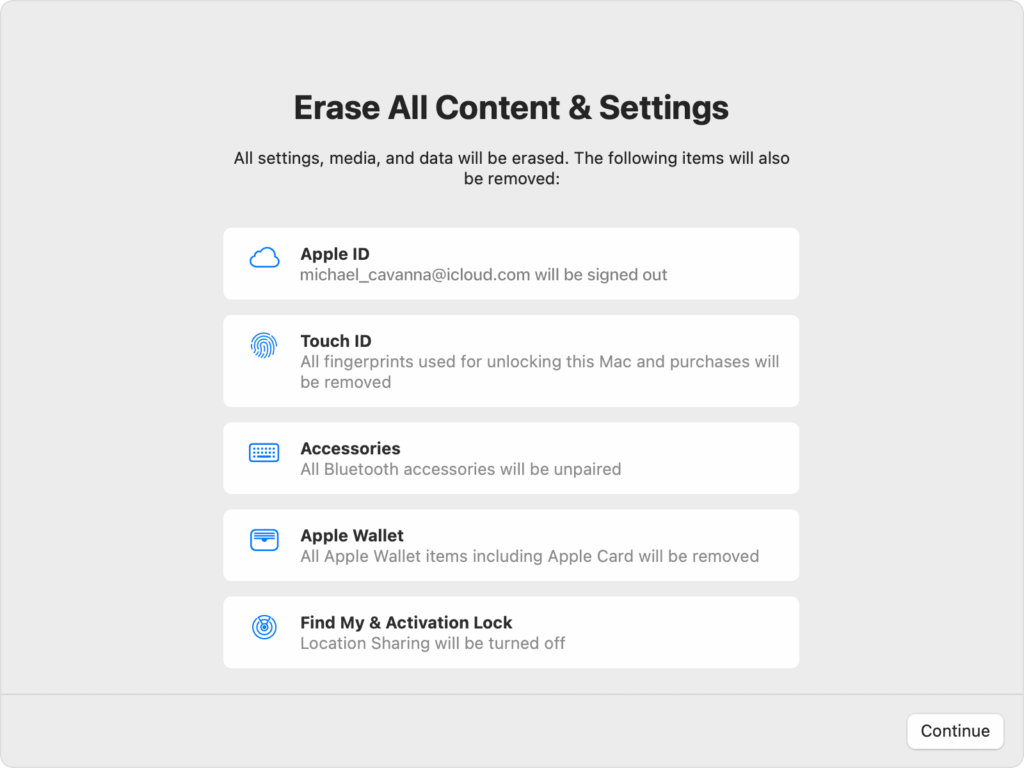
The right reset method depends on the macOS version and the MacBook model. Devices running macOS Monterey, Ventura, Sonoma, Sequoia, or Tahoe can use Erase Assistant, which is available on both Apple Silicon and T2 Security chip models.
To use that route, open the Apple menu in the top-left corner and go to System Settings. From there, choose General, then Transfer or Reset, and select Erase All Content and Settings.
When prompted, enter the admin password and choose Unlock. After that, continue pressing Continue until the MacBook restarts and follows the instructions shown on screen.
Older MacBook models with legacy Intel processors need a manual reset through Recovery Mode. This method is also useful when the login password is no longer remembered.
On an Intel Mac, the device should be powered off first, then the power button must be pressed together with Command and R until the Apple logo appears. On an Apple Silicon Mac, hold the power button until the startup options screen appears, then select Options.
After that, choose the user account and enter the admin password if it is still known. Wait until the macOS Utilities window appears, since that is where the deletion process begins.
From macOS Utilities, select Disk Utility and click Continue. In the left sidebar, choose Macintosh HD and press Erase at the top of the screen.
Set the name to Macintosh HD and choose APFS as the format. Then select Erase Volume Group or Erase, and wait until the process is fully complete before leaving Disk Utility.
This step removes the entire disk contents, including the operating system files and personal data. Because the deletion is permanent, it becomes the most decisive part of a clean reset.
After the disk has been cleared, macOS must be installed again so the MacBook can be used. A stable internet connection is required for this stage.
Return to the main macOS Utilities window, choose Reinstall macOS, and click Continue. Follow the installation instructions until the device reaches the welcome screen.
A reset is still possible even when the MacBook is no longer in hand. The Find My feature in iCloud allows data to be erased remotely without direct access to the device.
Open a browser from another device and log in to iCloud. Enter Find My, select the MacBook from the device list, and click Erase Mac before confirming the command.
Once that is done, the system will erase all data when the MacBook connects to the internet. This makes remote wiping a practical option if the device is lost, left behind, or already sent to a buyer.
Source: www.idntimes.com