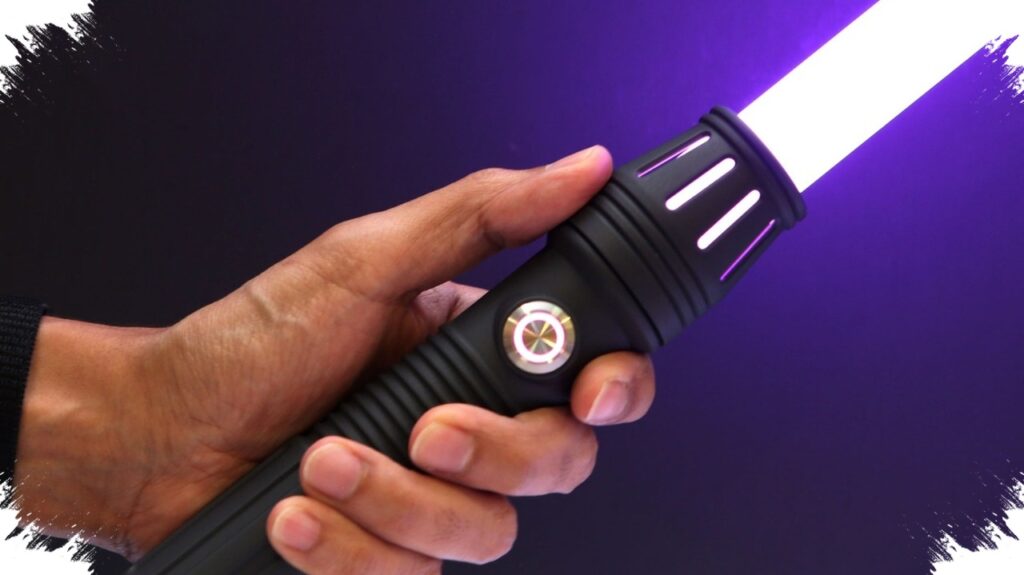
Adafruit has turned a Star Wars fantasy into a DIY electronics project that hobbyists can build at home with a Raspberry Pi RP2040-based board, basic coding, and a 3D-printed shell. The project creates a lightsaber-style prop with sound, light effects, and a custom hilt, making it more flexible than a typical toy saber.
The build centers on the Adafruit RP2040 Prop-Maker Feather, a microcontroller board powered by the Raspberry Pi RP2040 chip and equipped with a built-in speaker. To make the prop work as a lightsaber, the setup also needs an RGB strip, a speaker, a battery, and an ignition button.
What the project includes
Adafruit says the project is not a one-board solution, so users must gather several parts before assembly. The lightsaber effect depends on a mix of hardware, software, and physical design, which gives makers room to adjust the build to their own preferences.
- Adafruit RP2040 Prop-Maker Feather
- RGB strip
- Speaker
- Battery
- Ignition button
The company also offers a starter kit called “Make your own Lightsaber!” that simplifies shopping for the main components. However, the bundle includes the Prop-Maker FeatherWing, which does not use the RP2040 chip, so builders still need to pay attention to the exact board version before starting.
3D printing the hilt
The most visible part of the project is the hilt, or shell, which Adafruit provides as open-source CAD files. That lets users print the exterior in resin or filament and modify the design if they have the skills and tools for 3D modeling.
For builders without a 3D printer, the design can be sent to a third-party printing service such as JLC3DP. That lowers the barrier to entry and keeps the project accessible for hobbyists who want the prop without investing in expensive equipment.
How the blade effect works
The “blade” in this build is not a real plasma beam, of course, but a transparent polycarbonate tube with an outer diameter of one inch. Adafruit recommends sourcing the tube from prop-saber retailers such as The Custom Saber Shop and Ultrasabers.
The approach keeps the project practical while still delivering a convincing visual effect. It also gives builders a choice over blade length, fit, and durability, which matters if the prop will be used for display or light handling.
Steps needed to bring it to life
Adafruit describes the project as relatively simple and requiring only a small amount of soldering. Even so, the process depends on careful setup, especially when configuring the board and loading the right software.
- Install CircuitPython on the RP2040 Prop-Maker Feather.
- Add the required library files from Adafruit’s official resources.
- Connect the RGB strip, speaker, battery, and ignition button.
- Assemble the 3D-printed hilt around the electronics.
- Insert the polycarbonate blade tube and test the lighting and sound effects.
Once configured, the system can play sound effects, react to impacts, and switch colors based on the programmed settings. Battery charging is also designed to stay practical, since users can open the hilt and connect the control board to a USB cable.
Why it matters for DIY and Star Wars fans
The project shows how maker hardware can transform a pop culture icon into a customizable home build. It also reflects a broader trend in hobby electronics, where open-source files, 3D printing, and accessible microcontrollers allow users to build props that look polished without requiring industrial tools.
For Star Wars fans, the appeal goes beyond appearance because the saber can be tuned through code and modified through design. For DIY builders, the project offers a compact example of how coding, soldering, printing, and prop design can combine into one interactive build that is both functional and highly personal.